Alright folks, today was all about finally getting my hands on a decent piece of fire quartz. Been wanting one for ages, saw some stunning pictures online, but damn, actually finding a good one? That’s a whole other story. Tried my luck at the local crystal shop last month, ended up wasting fifty bucks on something that looked kinda dull under my crappy LED lights. Learned my lesson: gotta know what to look for BEFORE handing over the cash. So here’s exactly what I figured out the hard way.
The Hunt Begins (And Fails)
Walked into that crystal place near Main Street last Tuesday feeling optimistic. You know the spot. Saw a basket labeled “Fire Quartz” – score! Grabbed the biggest, clearest piece I could find. Paid up, got home all excited, pulled it out under my bright kitchen light… total letdown. Barely any sparkle. Just a flat, kinda muddy red rock. Gut feeling said “rip-off,” so I started digging online reviews and asking around in collector groups. That’s when I realized I needed a checklist.
Screw “Pretty,” Gimme the Facts
Forget those fluffy descriptions like “vibrant energy” or whatever. I needed concrete stuff. After tripping over my first purchase, I made this list based on actual hands-on fails and wins:Factor 1: Weight Matters More Than Size
That first piece felt… light. Almost hollow? Didn’t feel right. This time, I picked up every single candidate rock at the new shop down by Elm Street. Compared them. The keeper felt denser in my hand – substantial. Feels like you’re holding something solid, not cheap plastic.Factor 2: Check That Texture Like It’s Produce
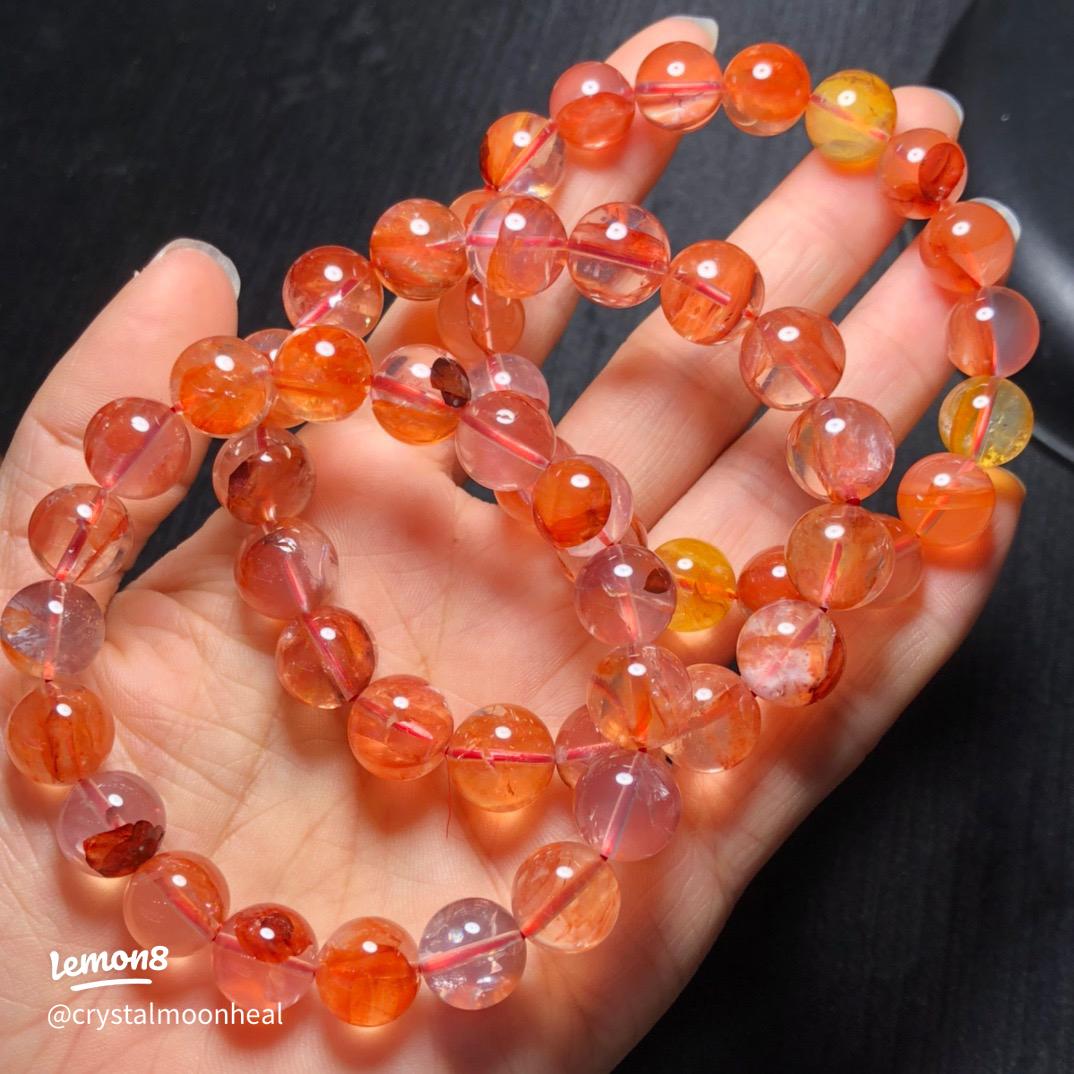
Got fooled by a shiny surface last time. Big mistake. This time, I ran my finger over it feeling for texture. Smooth, cool surface? Good sign. Rough, sandy, or weirdly greasy? Nah. My winner was smooth as glass. Like running your finger over an ice cube.Factor 3: Depth of Color, Forget Brightness
Sunshine or bright store lights make ANYTHING look vibrant. Learned that the costly way. This time, I cupped each piece in my hand, blocking the overhead lights. Peered deep inside. Not looking for bright red, but deep, rich color like wine, not candy. Found one where the red seemed to glow from inside, not just shine on top.Factor 4: Cracks and Clouds Aren’t Always Bad
Used to think flawless = perfect. Found out with fire quartz, some inside lines (inclusions, the nerds call ’em) actually create that cool “fire” effect when light hits right. Avoided pieces with obvious big cracks on the outside (chips waiting to happen!), but one piece had tiny lines running inside – shone my phone flashlight through it, and BOOM! Tiny sparks of gold and red danced inside. That’s the keeper.Factor 5: See It Under YOUR Lights
Most Important Lesson! Don’t trust the shop lights! Asked the guy behind the counter if I could step outside under natural sunlight. He looked annoyed, but tough. Grabbed my top contenders. Went outside. Held them up. One piece looked pretty good inside? Outside, under plain daylight, it looked dull and lifeless. Trashed that one. The keeper? In natural light, the deep red shone like an ember, and those inside lines caught the sun, sending little sparks across my hand. That was the moment I knew. “This one. Finally.”
The Sweet Relief of Finally Getting It Right
Handed over my cash (felt good this time), walked out feeling like I cracked the code. Got it home, plopped it on my windowsill where the afternoon sun hits. Just sat there watching the light play inside it. That feeling of “Yeah, THIS is what it’s supposed to look like”? Priceless. My wallet sang a happy tune this time.
Moral of the story? Forget hype. Feel it, weigh it, block the lights to see the true color, always check under daylight, and embrace some internal quirks. Do that, and you won’t end up with an overpriced paperweight. My shelf looks dope now.