The first time I launched Baldur’s Gate 3, I was incredibly excited. I clicked “New Game,” and it jumped straight to the character creation screen. There was a little figure standing there, waiting for me to design its appearance. But I was completely lost—I wanted to change the face shape, change the hair, but I had no idea where to start.
I clicked “Origin,” thinking I could pick a preset face. No luck.
I clicked “Class” next, hoping that might change things. Still no luck.
I clicked all over the screen, like I was searching for a hidden switch.
Finally, I just moved my mouse up randomly—and bam! There it was, a tab at the top labeled “Customize”!
That’s when it hit me: It was right there all along! Such a big button, and I hadn’t seen it at first.
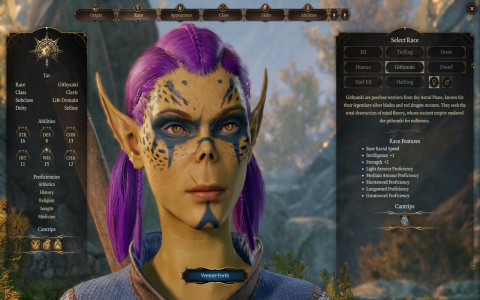
Turns out “Customize” is the dedicated area for designing your character’s appearance. Whatever you want to change, you start here.
One look inside, and the options were overwhelming
After clicking “Customize,” I was almost stunned.
There were so many things you could tweak! It felt like opening a toolbox for sculpting faces, where every detail could be adjusted.
First, head shapes: There were 12 basic face types alone. Some were wide, some narrow, some with sharp chins perfect for nobles; others were round and friendly-looking. I tried each one to see which felt right.
Then came skin tone: This option had tons of choices. From very pale, milky shades all the way to deep browns, with many intermediate levels in between.I experimented with several before settling on a shade that felt natural.
Hair and facial hair are also customizable:
- Hairstyles include short cuts, long locks, curls, and even bald heads…
- Colors range from black and brown to blonde, red, and even blue or purple (if you fancy a fantasy look).
- For male characters, you can add facial hair.Beards come in several types: stubble, full beard, goatee—all adjustable.
What really caught my attention were those “little sliders.”
At the bottom of the screen, there’s a row of bars you can drag left or right, like:
- Nose width: wider or narrower
- Chin projection: more forward or recessed
- Eye shape: upturned or downturned
- Cheeks: more rounded or sunken
At first, I thought these small tweaks were pointless, but once I started playing with them, I couldn’t stop.
For example, when I raised the “cheekbone height,” my character suddenly looked like a movie star;
Pulling it down made them look like they hadn’t eaten in days, their face gaunt and sunken.
I spent ages sliding these sliders back and forth. Just adjusting the nose alone took me nearly 20 minutes.
I made a huge mistake—don’t follow my lead
Once I finally tweaked the face, hair, and skin tone to perfection, I was thrilled with my handsome creation.
Then I clicked “Next” to choose a profession and background.
Midway through, I suddenly realized: The eye color was still the original green!
I’d been so focused on adjusting the face that I forgot to change the eyes.
Now it looked super weird—my custom face paired with the system’s default eyes, totally mismatched.
I panicked: How do I go back and fix this?
I tried the “Back” button, only to find it only undid one step.
That meant I had to click all the way back, redoing my class, skills, and background choices just to get back to the “Customize” screen.
I resigned myself to backtracking step by step and resetting everything. It wasted so much time and left me incredibly frustrated.
So let me warn you: Before clicking “Next,” always double-check every appearance detail.
Especially things like eye color, hairstyle, and skin tone—they’re easy to overlook.
Once you move to later pages, changing anything means starting over, which is a huge hassle.
Finally Done—My Character Looks Like “Myself”
I changed the eye color to a deep brown, giving them more life.
I took another overall look: face shape, hair, beard, eyes, skin tone… everything harmonized.
Only then did I carefully choose a name, profession, and backstory.
With everything set, I clicked “Finish.”
The cutscene began, and seeing my own character standing there, speaking, walking, and moving—it felt truly different.
Unlike other games where you use a system-generated default face and feel like you’re playing someone else.
This character, from head to toe, was meticulously crafted by me. He feels like “my own person.”
Even when he later got infested by brainworms in his eyes, I still thought—this is my brother. I have to save him.
A Few Tips I Learned
- The “Customize” button is right at the top—don’t miss it. Unlike other games that call it “Face Sculpting” or “Appearance,” it’s simply labeled “Customize,” but that’s exactly what it does.
- Feel free to experiment with the sliders. Don’t worry about making weird adjustments—you can always undo them. Drag them around a few times, and you’ll discover many unexpectedly good-looking combinations.
- Don’t rush after editing. Always inspect from head to toe: Is the hair right? Does the eye color work? Should you trim the beard a bit? Only click next when everything looks perfect.
- Be patient. Character creation isn’t a quick task. Spending an hour isn’t unusual. But when you’re satisfied, your immersion in the game will be much deeper.
Ultimately, this character is your “face” in the game.
Taking the time to make them look good and exactly how you want them is truly worth it.
When you see them standing on the battlefield, charging into battle shouting your name, you’ll realize: this isn’t just a game character—this is “me.”